Description
Text-Based User Interfaces · Applied Go

Applied Go
Go beyond the Go tutorials
Subscribe:
[
Text-Based User Interfaces
Apr 02, 2017
14 minute read
Share:
Want to equip your command-line application with a nice visual user interface? TUI libraries are here to help.
Halloween Special! My Master Go course is available at a third (33%) off the original price until Nov 10th. Take this chance to get a Click here for details.
Console applications usually take some parameters at start, and maybe some more input through basic console I/O. And that’s ok in most cases, though sometimes it would be great to have a visual user interface but without the code size and complexity of a full-blown Web app.
Text-Based User Interface libraries (or TUI libraries) meet this need. They bring panes, input, output, mouse support, graphics, and audio, to your terminal.
OK, so can we do a side-by-side test, please?
Unfortunately, no.
Originally, I planned to evaluate three to four TUI libraries for Go side-by-side, using a sample app definition with a specific set of features to be tested. I had a few requirements on the libraries: They should -
- be fairly complete TUI libraries, supporting flexible layouts, standard UI widgets like buttons, menus, text entry, text output, mouse support, etc.
- provide high-level abstractions (as opposed to only providing low-level UI primitives),
- be active projects (that is, the last commit should not date back to months or even years ago),
- be past the alpha stage, and
- have reasonable documentation or sample code. (No, API docs don’t count. I wanted at least a simple how-to-start tutorial that covers the basics.)
Turned out that none of the libraries I found passes all of the requirements.
So that’s it? No single all-in-one, high-level GUI lib with decent documentation?
Well, not if you really want all those nifty UI features at once. However, if you can forego some of the requirements, there is indeed a small selection of capable TUI libraries at your disposal that I’ll briefly introduce below.
Just one thing before we start.
The list is (and cannot) be complete. I used GitHub.com, awesome-go.com, GolangLibs.com, and LibHunt.com to find TUI libraries but still there is no guarantee that I found all relevant projects out there.
Without the tips of a couple of redditors in this /r/golang thread, clui and wm would perhaps have slipped through.
And then, of course, the above list of criteria is a very fuzzy filter, and you might have included a library that I ruled out because of this list.
But now let’s move on to the TUI library overview.
Bare bone TUI libraries
If you are fine with building your UI on top of a handful of UI primitives, there are two libraries that look fairly stable and complete:
nsf/termbox-go
termbox has a small and straightforward API. It uses a two-dimensional cell buffer to represent the terminal screen, with a few methods like setting cells, clearing the screen, or setting the cursor. All input, whether keyboard, mouse, or resize events, is tracked through a unified Event type.
As simple as the API might seem, it has not prevented others from creating interesting projects on top of termbox, including higher-level TUI libraries (termui, gocui, tui-go and `termloop``), simple games, godit (a text editor) and hecate (a hex editor), and more.
The README makes no claims about supported platforms. The code includes some syscall_*.go files, indicating that termbox-go runs on Linux, macOS, Windows, OpenBSD, NetBSD, FreeBSD, and Dragonfly BSD.
Strengths
- A fair range of supported platforms
- Popular base TUI layer for a number of TUI projects
gdamore/tcell
According to the author, tcell was born out of the need for certain features that termbox-go does not provide, and patching termbox-go turned out to not be a suitable way to go forward. tcell claims to have a couple of advantages over termbox-go, including additional functionality, better portability, better I/O, better support for mouse, Unicode, colors, and more. (I cannot comment on these claims, as I have tested neither termbox nor tcell in great depth.) tcell is the TUI library behind the Micro editor, and is also used by godu.
According to the README, tcell works on POSIX systems that provide a POSIX termios implementation with /dev/tty, as well as on Windows.
The “POSIX” requirement includes Linux, macOS, FreeBSD, and Solaris, and certainly more systems that are not explicitly listed in the README.
Strengths
- A wide range of suppored platforms
- A rich API
Higher-level libraries
gizak/termui
termui is one of the high-level TUI’s that are built on top of termbox-go. It is specialized on displaying information in graphical form - as bar chart, line diagram, spark line, or as a gauge. Text output is also possible of course. The UI is built on the concept of widgets, or blocks, that contain exactly one type of data representation - text, charts, or diagrams.
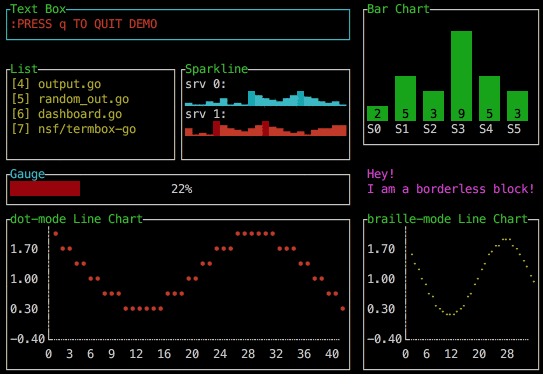
termui provides a static layout and a grid layout. The grid layout can respond dynamically to resizing of the terminal window.
On the input side, termui offers a simple event handling system that can react to key presses, window resizes, or timers.
What is missing from termui to make it a “feature-complete” TUI toolkit is high-level input handling (input boxes, buttons, menus, drop-down lists etc). I also missed some sort of resizeable panes, although the grid layout probably provides a suitable alternative to that.
A couple of projects have already been built with termui, including ctop.
Strengths
- Rich set of data visualization widgets
- Flexible, resizeable 12-column grid layout
jroimartin/gocui
This library almost seems like the opposite of termui: No fancy widgets anywhere, but instead, building blocks for split views, overlapping views, editable views, and event handling for keyboard and mouse events.
Strengths
- Text input views
- Resizeable layouts via custom redraw handler
Promising projects
I couldn’t resist including the following projects here, although they do not meet some of the inclusion criteria. Still, they look very promising and may offer one or the other feature that you might have missed in this list so far.
VladimirMarkelov/clui
From the screenshots, this is perhaps the best-looking TUI library in this list. It also looks fairly advanced already, featuring a rich set of UI widgets like buttons, drop-down lists, gauges, etc. as well as a window manage and theming. However, the lack of documentation (except for the API docs) indicates that this is still a work in progress.
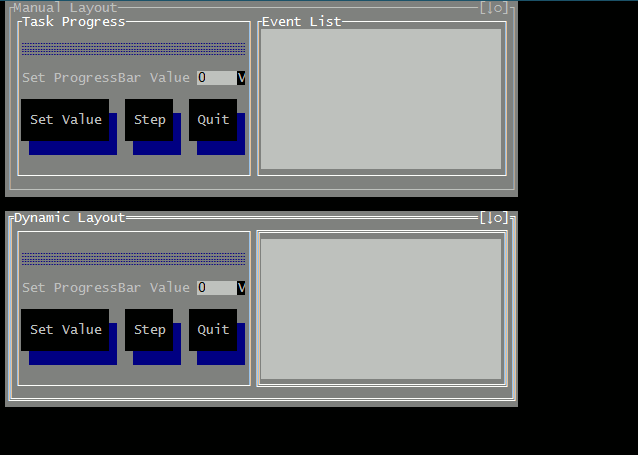
Strengths
- Many standard UI widgets
- Multi window capability, including resizing and overlapping
cznic/wm
Definitely a work in progress, wm manages overlapping, resizeable, decorated windows with scrollable content.
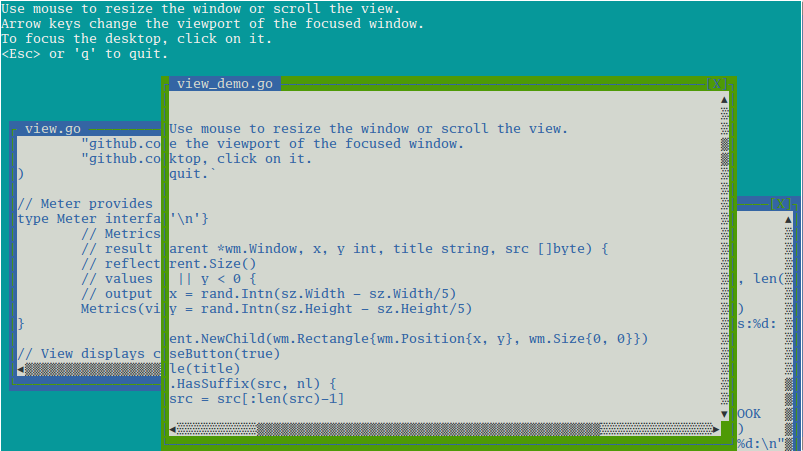
Strengths
- Multiple, overlapping windows
marcusolsson/tui-go
The building blocks of tui-go are widgets and layout boxes. There seems no support for mouse-based resizing of layout boxes, but each layout box can assume one of (currently) two automatic resizing behaviors.
Strengths
- Easy layout through horizontally and vertically stacked layout boxes
- Layout automatically adjusts to changed terminal size
- Text input boxes
termloop
This one is a special kind of TUI. termloop is not a general TUI library. Rather, it is a specialized toolkit for console-based games. So perhaps you won’t be able to build a “standard” application UI on top of it, but you surely can make your windows make a sound when colliding! 😉
Strengths
- Support for console games
Update 2018-01-08
rivo/tview
A newcomer in 2018. In order avoid having to always write UI controls from scratch, the author decided to create a package choke-full of high-level interactive controls like:
- Input forms
- Text views (multi-colored and navigable)
- Tables and lists (navigable and selectable)
- Layout managers (flex and pages)
- and more.
tview is based on gdamore/tcell.
Strengths
- All-in-one solution, including a comprehensive set of controls (from simple input field to complex table control), support for automatic layout, and an application wrapper.
- Powerful controls
- Intuitive API with optional support for dot-chaining of method calls (if you really want to)
- Detailed documentation with sample code, via godoc.org API doc and GitHub Wiki.
Code
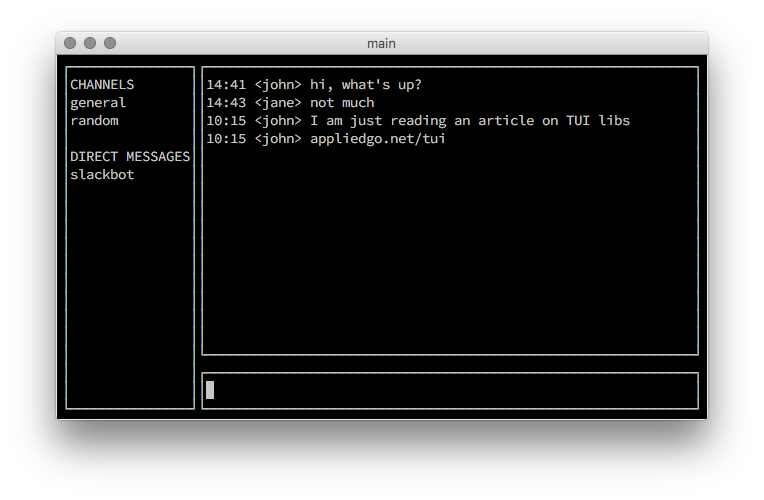
As always, there is some code included to try out at your end. This time, the code uses the two libraries termui and gocui for creating a minimal UI with a simple layout - similar to the layout in the tui-go screenshot:
- A list box with a fixed width, positioned at the left side
- A text entry box with a fixed height, positioned at the bottom
- A general-purpose output pane in the remaining area
If the library provides a text entry widget, text entered there shall appear in the output pane.
Imports and globals
package mainUnder normal circumstances, importing two UI libraries at the same time is probably not a good idea, as each has its own event loop. This demo code takes care of using only one of these libraries at a time.
import (
	"fmt"
	"log"
	"os"
Both TUI packages are abbreviated to avoid making the code overly verbose.
	t "github.com/gizak/termui"
	c "github.com/jroimartin/gocui"
	"github.com/pkg/errors"
)

const (
List box width.
lw = 20Input box height.
	ih = 3
)
Items to fill the list with.
var listItems = []string{
	"Line 1",
	"Line 2",
	"Line 3",
	"Line 4",
	"Line 5",
}
termui
Let’s start with termui.
termui organizes its content as “blocks”. Blocks can be positioned using absolute coordinates, or they can be integrated into a 12-column grid layout. The grid layout allows to dynamically adjust the content’s width when the user resizes the terminal window.
Right now, there is no automatic height adjustment available, but an issue has been raised to request this feature.
The test code works around this restriction by manually re-calculating the heights of the list block and the output block before re-aligning and re-rendering the UI.
func runTermui() {Initialize termui.
	err := t.Init()
	if err != nil {
		log.Fatalln("Cannot initialize termui")
	}
termui needs some cleanup when terminating.
defer t.Close()Get the height of the terminal.
th := t.TermHeight()The list block
	lb := t.NewList()
	lb.Height = th
	lb.BorderLabel = "List"
	lb.BorderLabelFg = t.ColorGreen
	lb.BorderFg = t.ColorGreen
	lb.ItemFgColor = t.ColorWhite
	lb.Items = listItems
The input block. termui has no edit box yet, but at the time of this writing, there is an open pull request for adding a text input widget.
	ib := t.NewPar("")
	ib.Height = ih
	ib.BorderLabel = "Input"
	ib.BorderLabelFg = t.ColorYellow
	ib.BorderFg = t.ColorYellow
	ib.TextFgColor = t.ColorWhite
The Output block.
	ob := t.NewPar("\nPress Ctrl-C to quit")
	ob.Height = th - ih
	ob.BorderLabel = "Output"
	ob.BorderLabelFg = t.ColorCyan
	ob.BorderFg = t.ColorCyan
	ob.TextFgColor = t.ColorWhite
Now we need to create the layout. The blocks have gotten a size but no position. A grid layout puts everything into place. t.Body is a pre-defined grid. We add one row that contains two columns.
The grid uses a 12-column system, so we have to give a “span” parameter to each column that specifies how many grid column each column occupies.
	t.Body.AddRows(
		t.NewRow(
			t.NewCol(3, 0, lb),
			t.NewCol(9, 0, ob, ib)))
Render the grid.
	t.Body.Align()
	t.Render(t.Body)
When the window resizes, the grid must adopt to the new size. We use a hander func for this.
t.Handle("/sys/wnd/resize", func(t.Event) {Update the heights of list box and output box.
		lb.Height = t.TermHeight()
		ob.Height = t.TermHeight() - ih
		t.Body.Width = t.TermWidth()
		t.Body.Align()
		t.Render(t.Body)
	})
We need a way out. Ctrl-C shall stop the event loop.
	t.Handle("/sys/kbd/C-c", func(t.Event) {
		t.StopLoop()
	})
start the event loop.
	t.Loop()
}
That wasn’t too difficult, was it? Text entry is missing here, as termui has no input controls yet. Still, implementing an input box is possible with the available API methods; see the _example subdirectory in termui’s repository. It is just too much code for this blog article, so I leave this as an exercise to the reader.
gocui
Now let’s see how gocui solves the same task.
Set up the widgets and run the event loop.
func runGocui() {Create a new GUI.
	g, err := c.NewGui(c.OutputNormal)
	if err != nil {
		log.Println("Failed to create a GUI:", err)
		return
	}
	defer g.Close()
Activate the cursor for the current view.
g.Cursor = trueThe GUI object wants to know how to manage the layout. Unlike termui, gocui does not use a grid layout. Instead, it relies on a custom layout handler function to manage the layout.
Here we set the layout manager to a function named layout that is defined further down.
g.SetManagerFunc(layout)Bind the quit handler function (also defined further down) to Ctrl-C, so that we can leave the application at any time.
	err = g.SetKeybinding("", c.KeyCtrlC, c.ModNone, quit)
	if err != nil {
		log.Println("Could not set key binding:", err)
		return
	}
Now let’s define the views.
The terminal’s width and height are needed for layout calculations.
tw, th := g.Size()First, create the list view.
lv, err := g.SetView("list", 0, 0, lw, th-1)ErrUnknownView is not a real error condition. It just says that the view did not exist before and needs initialization.
	if err != nil && err != c.ErrUnknownView {
		log.Println("Failed to create main view:", err)
		return
	}
	lv.Title = "List"
	lv.FgColor = c.ColorCyan
Then the output view.
	ov, err := g.SetView("output", lw+1, 0, tw-1, th-ih-1)
	if err != nil && err != c.ErrUnknownView {
		log.Println("Failed to create output view:", err)
		return
	}
	ov.Title = "Output"
	ov.FgColor = c.ColorGreen
Let the view scroll if the output exceeds the visible area.
	ov.Autoscroll = true
	_, err = fmt.Fprintln(ov, "Press Ctrl-c to quit")
	if err != nil {
		log.Println("Failed to print into output view:", err)
	}
And finally the input view.
	iv, err := g.SetView("input", lw+1, th-ih, tw-1, th-1)
	if err != nil && err != c.ErrUnknownView {
		log.Println("Failed to create input view:", err)
		return
	}
	iv.Title = "Input"
	iv.FgColor = c.ColorYellow
The input view shall be editable.
	iv.Editable = true
	err = iv.SetCursor(0, 0)
	if err != nil {
		log.Println("Failed to set cursor:", err)
		return
	}
Make the enter key copy the input to the output.
err = g.SetKeybinding("input", c.KeyEnter, c.ModNone, func(g *c.Gui, iv *c.View) error {We want to read the view’s buffer from the beginning.
iv.Rewind()Get the output view via its name.
		ov, e := g.View("output")
		if e != nil {
			log.Println("Cannot get output view:", e)
			return e
		}
Thanks to views being an io.Writer, we can simply Fprint to a view.
		_, e = fmt.Fprint(ov, iv.Buffer())
		if e != nil {
			log.Println("Cannot print to output view:", e)
		}
Clear the input view
iv.Clear()Put the cursor back to the start.
		e = iv.SetCursor(0, 0)
		if e != nil {
			log.Println("Failed to set cursor:", e)
		}
		return e

	})
	if err != nil {
		log.Println("Cannot bind the enter key:", err)
	}
Fill the list view.
for _, s := range listItems {Again, we can simply Fprint to a view.
		_, err = fmt.Fprintln(lv, s)
		if err != nil {
			log.Println("Error writing to the list view:", err)
			return
		}
	}
Set the focus to the input view.
	_, err = g.SetCurrentView("input")
	if err != nil {
		log.Println("Cannot set focus to input view:", err)
	}
Start the main loop.
	err = g.MainLoop()
	log.Println("Main loop has finished:", err)
}
The layout handler calculates all sizes depending on the current terminal size.
func layout(g *c.Gui) error {Get the current terminal size.
tw, th := g.Size()Update the views according to the new terminal size.
	_, err := g.SetView("list", 0, 0, lw, th-1)
	if err != nil {
		return errors.Wrap(err, "Cannot update list view")
	}
	_, err = g.SetView("output", lw+1, 0, tw-1, th-ih-1)
	if err != nil {
		return errors.Wrap(err, "Cannot update output view")
	}
	_, err = g.SetView("input", lw+1, th-ih, tw-1, th-1)
	if err != nil {
		return errors.Wrap(err, "Cannot update input view.")
	}
	return nil
}
quit is a handler that gets bound to Ctrl-C. It signals the main loop to exit.
func quit(g *c.Gui, v *c.View) error {
	return c.ErrQuit
}
Our main func just needs to read the name from the TUI lib from the command line and execute the respective code.
func main() {
	if len(os.Args) <= 1 {
		log.Println("Usage: go run tui.go [termui|gocui]")
		return
	}
	if os.Args[1] == "termui" {
		runTermui()
		return
	}
	if os.Args[1] == "gocui" {
		runGocui()
		return
	}
	log.Println("No such option:", os.Args[0])
}
Conclusions from the code
Both libraries have their pros and cons. The termui code seems more concise, but this might be due to the lack of an editing feature (that would have added some lines of code), and perhaps also due to the grid layout engine that made the resize handler a two-liner.
The gocui layout is certainly more flexible but the tradeoff is increased code size. Text input only needs a few lines of code in gocui, whereas data visualization is where termui shines.
I leave the decision to you; maybe you even prefer to go low-level with termbox or tcell, or you might decide to give the other TUI libs a try.
How to get and run the code
Step 1: go get the code. Note the -d flag that prevents auto-installing the binary into $GOPATH/bin.
go get -d github.com/appliedgo/tui
Step 2: cd to the source code directory.
cd $GOPATH/src/github.com/appliedgo/tui
Step 3. Run the binary with either “termui” or “gocui” as a parameter.
go run tui.go termui
go run tui.go gocui
Happy coding!
Changelog:
2018-01-08: Added rivo/tview
Or subscribe without receiving videos
Share
Like this article? Tell your friends!
Find me on:
Activity